Wednesday 29 April 2015

Free-Machine Embroidery

For those of you who don't know, free-machine embroidery is where you lower the feed dogs (the two metal clamps on the sewing machine that drag the fabric through to create a straight stitch) and sew "freestyle".


Because there are no feed dogs, the machine can stitch in any direction, any size stitch, at any pace you like. You can create any shape or line style you can imagine. I like to draw with machine embroidery, but I will also show you how to use it to create pattern.


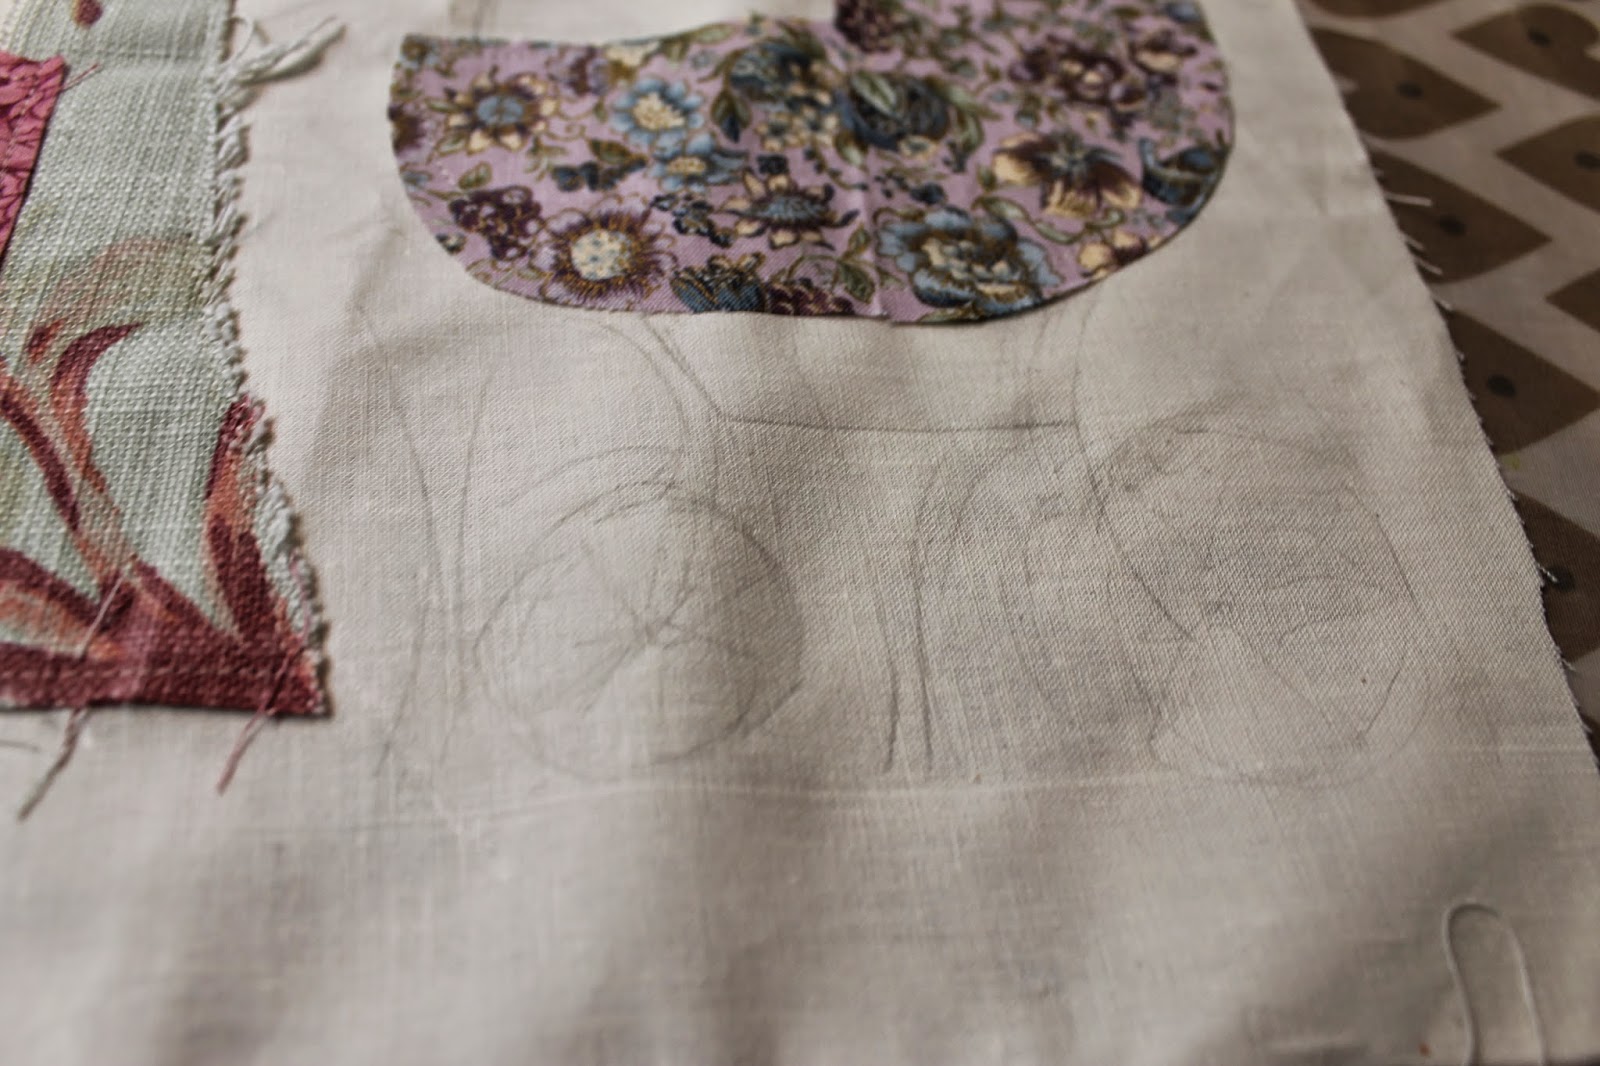
When I'm free-machine "drawing" on a piece, like this one here that I have already attached some scraps of fabric to, first I like to sketch out my design lightly in pencil. You don't have to do this, it just makes it easier to follow when it is under your needle.


Lower the feed dogs on your machine, and attach a Free Machine Foot (it is the one that has a small circle at the bottom rather than the ordinary foot). If you don't have a free machine foot, or the ability to lower the feed dogs, I know for some machines you can get metal plates that attach on top to cover the feed dogs to stop them interfering. If you can't do that either, then you may want to ask to use another machine; most Adult Education centres will have machines in them that you may be able to use.


The most important thing about free machine embroidery is to take your time first of all. Get the feel of the machine, because it is a VERY different feel to normal sewing. It can be tempting to let the machine get away from you and you start panicking and sew faster, but if that happens just stop, take a breath, maybe take the needle out and unpick that line. Start slow, and soon you will get more confident.


I love free-machine embroidery because it can lend an excellent sketchy effect (that is, an effect of having been sketched, not an effect of becoming suspicious) which I find you can't really get with hand stitching, at least not without being very adept at it.


Free-machine embroidery does pucker your fabric somewhat, if you aren't used to the way the stitches are acting. If you are scared of this happening, take it really slow and make sure to hold the fabric tightly in your hands as you guide it through the needle. You can also attach a piece of paper to the back of your work to make it easier to work with, and then simply pull the paper off the back afterwards.


Once you try it, you may become addicted!

Sunday 26 April 2015

Playing with Scraps

My fabric stash has lately been greatly decreased in size, until I am left with a few fat quarters and a basket of scraps. Now that bootfair season is rolling round again, I hope to rectify this, but until then I have to satisfy my need to play with beautiful fabrics. It's all very tragic really.


So I decided to just have a play. I don't know about you, but if I get it into my head I'm about to embark on a huge, never-ending project the size of a king's bed, I'll often stall at the first hill. By which I mean I will get all my fabrics out, lay them on the floor, spend hours looking at them before deciding all my ideas were rubbish and I'd never finish it anyway.

I picked out a few of my favourite pieces to play with, with no sort of plan or idea where it would go.


Out of those, I chose these 11 scraps to use, because I thought they created a rather striking (if garish) colour palette. They really are scraps in the best meaning of the word; the smallest is smaller than a tea coaster.


I began laying them out on a plain white pillow cover. At first, I tried using them in a landscape way; a beach, maybe, with yellow seas and a red sailboat over a red beach (see below).


But that just wasn't working out. It felt rather too forced. So instead I picked up the two longest pieces (the straggly busy print cream and the square angle cut red flowers) and laid them next to eachother and bang there was a ladies' shoulders and arms. A few more pieces laid down later, and;


I swear, in my head, I heard an old bossy Yorkshire woman saying "'Ere, Sir, look at what your 'ounds 'ave done to my best pinny!"

Once I had fallen in love with my scrap fabric lady, I turned her over onto a piece of paper, so that I had the blank white sheet and a reverse of the fabric layout saved neatly to one side.


I ironed the white pillow case, and really ought to have ironed the scraps as well, but in one way I liked the rag-tag look of the old housekeeper and in another way I was very tired and the thought of more ironing, which I detest, was intolerable.


Because I'd decided that the "pinny" had been "'ad by the 'ounds" I then had to make it severely more raggedy and chewed up. So I took a fork to it, and scratched and scraped and tore and ripped and had a real good time.


I pinned the pieces down, to stop them flying away once I tried to sew them on. You could also hand sew them on, tack them on with large hand-sewn stitches, or simply sew them on one by one, but I like to make sure the picture doesn't get tilted or bent in a strange way under the machine.


Sewing it was a pain in the backside because I had not used enough pins. I took off the bottom three pieces to focus on the top, and after they were sewed returned to the bottom bits and repinned them on. If you feel like you're out of control, or something's going wrong, don't be afraid to stop and change something. Just because the book says Do it all in one Go, if you're struggling or your machine is getting in a tangle, just take it at your own pace.


She's not finished yet obviously, I have some ideas for free-machine embroidering her face, legs and hands. I might hand embroider the little quote at the bottom, so people can hear her voice like I did.


Just goes to show, even if all you have are a box of old, cut up raggedy scraps, you can still have some real good fun not worrying about wasting any of your newly bought precious stash!

Saturday 25 April 2015

Cas Holmes Workshop

I was lucky enough today to attend a Cas Holmes workshop in the theme of "Spring Greens" collage work with fabric and papers. Below is a quick recap of what we did, so you can try out a few of the techniques. Don't forget to check out Cas's website!

First, we prepared our mono-printing plate with yellow acrylic paint in a thick layer. We used a brush, but you could use a roller; the plate's we used were 4mm glass, but you could use metal or perspex plastic.


Next, we mixed blue acrylic with the yellow straight onto the plate. Cas was trying to get us to mix interesting colours and encourage us to use unusual mark making techniques straight onto the plate. 


We laid plants onto the plate; wildflowers, leaves, weeds, as well as other interesting mark-making materials such as laces or strips of fabrics.


We lay a sheet of fabric over the plate, and pressed hard to create a print on the fabric. After lifting the fabric off, you could use the leftover paint on the plate to create a second, reverse print, on another bit of fabric (or the same fabric). The flowers and plants could also then be used to create a print as well. All in all, three prints from the one plate of paint.


We created a complete glut of these prints; it was so much fun playing with different colours and compositions; you could use so many different things to create prints, including stencils or draw on the back of the fabric with pens.


Above is an example of the prints we made, I think this one was made by mum. It really was such fun, and the work you can do afterward with the prints are limitless.

Cas Holmes does some really marvelous work with her collages and textiles. If you would like to see more, check out her website (link at the top) or get yourself one of her books Here and Here. She also teaches courses like this one today, and is a wonderful teacher; if you get a chance to take one of her workshops, I would really suggest you do!

Thursday 23 April 2015

Experimenting

It's always said that people experiment in collage; sorry, that's meant to be college but it's actually more correct in this instance...


Today I decided to create a fold up dollhouse book, similar to those you got in the Victorian times which were a backdrop that stood up allowing "rooms" for playing in with dolls. It was, in the most honest term, an utter experiment; and it went utterly tits-up. The hinge was too big, the pages didn't close more than 90 degrees, and each page resembled a house background only if you were giving some artistic license. A lot of artistic license, really.


But that's okay, really, because it was fun doing it and I tried out some new ideas. They didn't work, but that's all part of the process! 
For one thing, the cardboard I'd chosen was too flimsy for such rigorous application of materials. For another thing, I hadn't thoroughly planned my design for each page through, which can sometimes turn out really nice but in this case turned out messy and uncoordinated. I really hate them.

I think I might try again in fabric next time; a textile book or quilt book, maybe backed by Vylene or some thick wadding. I've not given up on the idea yet!


Well, it was worth a try, and I'll give them to mum to see if she can do anything with them in her masterful manner.

Anyway, the moral of the story is to not stop experimenting; sometimes things go wrong, and you hate what you have made; I wanted to post this to show that it does happen, because if you read magazines and blogs like I do you can be rather overcome with post after post of perfect works of art and you begin to think maybe you make more mistakes than others. Mistakes happen. To everyone.

And if you're wondering why I'm talking in such an affectatious tone, I've just binge-watched an entire season of Hercule Poirot by Agatha Christie and I've come over all vintage. 

Tuesday 21 April 2015

Flat-Pack Dollhouse

 I picked up this flat-pack dollhouse kit on the side of the road in Changsha, China (showing off a little bit now) for £2.50. It was described to me as an "English Style Villa" but I can't say I've ever seen a house like this round these parts...


The kit, like a few others that you can get on Amazon (Link to Similar Product on Amazon) come as a few sheets of laser cut balsa wood, from which you pop the pieces out and assemble it. It doesn't come with instructions, and it does take the patience of a saint. Just a warning. 


After an hour and a half, I'd put it together, and was pretty happy with how it turned out.


From the picture on the front, I wasn't sure if it had any floor partitions or if I'd had to put them in myself out of card; luckily it did, which meant it was more sturdy. It's actually fairly small, probably less than 1/24 scale. I really liked the weird additions, like the circular window and the strange ramp to the oriental porch and the bell tower... 


If you are a seasoned crafter, you may have a large box (or number of boxes) of interesting papers. Wallpaper samples, writing papers, magazines and catalogues, specialty papers from hobby shops, interesting packaging; soon you'll find yourself holding on to old bits of rubbish and thinking that would make a great dollhouse floor!


You can find all sorts of interesting things to add on if you keep a good eye out; washi tape is great for these sorts of projects, because it is often self-adhesive.


The best bit about these kinds of projects is that you can really let yourself have fun; because a lot of the work is already done for you with the construction, you can focus all your attention on the decoration. Also, because you haven't spent a whole lot of time on the construction and planning, you can play around with risky ideas knowing it's okay if they go wrong.


Go on then! Try something you think might go wrong, or might look absolute rubbish, you may surprise yourself. 

Monday 20 April 2015

Beating the Block

As with a lot of things in life, sometimes you hit a bit of a block. Everything you make, or do, or write, just seems blah and desperate and not what you imagined when you set out, so full of hope and inspiration. This happens a lot. 


In the "world of craft" there is a term; UFO or Un-Finished Object. This could be anything, from a few scraps you sewed together on a whim to a whole king sized quilt top that's tacked to the wadding but you just can't face it anymore, and so they sit in the draw (you know the draw) until maybe one day inspiration hits again, and you finish it, or you give it to your crafty friend as a round-robin or you just plain give it to a charity shop.


This happened, anyway. I had made a doll in the expectation she would become a beautiful geisha figure, with black linen hair I had stitched into the head piece and a face I had embroidered on after many hours of trying to thread a whole skein of embroidery threads into a beading needle. (I was much younger and fairly stupid.)


Anyway, she was finished. I didn't turn her inside out and by this point she was looking raggedy and farther and farther away from the flawless, perfect geisha doll I had imagined. So rather than throw her in the UFO draw, I took out my Pitt pens and started taking out my Block resentment on the doll in form of ugly little doodles that made no sense.


And you know what?  I think this is how she was always meant to be.


Of course, it would have been nice to end up with a beautiful geisha style doll, but this obviously wasn't the time. Instead, I like to think she is from the mean streets of Edo where mob bosses got tattoo'd once they became Yakuza. Maybe some day I'll make her a little geisha sister, but at the moment she is a good reminder that sometimes the block is there for a reason; you might be on the wrong path, and you can either get off the path altogether or turn off into a weird looking side-street that turns out to be an exciting and adventurous new destination.

Or something less pretentious.

Monday 6 April 2015

Paper Mache Dolls House

Ages ago, I made a dollhouse out of an old cardboard box and some ripped up magazines. It was so easy to make, and I really enjoyed it; it could be a great project to do with children or for children!


I found a box that had a large flap lid, which became the front of the house and, when folded down, the garden.
Firstly, I cut some crude squares out of the back of it to form two windows. and a few strips of cardboard from a cereal box I positioned as a floor and two long walls. Next, I mixed up a huge batch of water diluted PVA glue and began layering strips of kitchen paper and toilet tissue on top and around the structure. I made sure to bend around the sides of the windows so there was no rough edges left.


Once that was dry, I did another layer, and that dried too. It is pretty sturdy, but another layer wouldn't harm anyone. I then cut out hundreds of pictures from magazines, photocopies of books, old books from charity shops, and paper ephemera I had collected. I liked to rip the edges to leave a rough look, and it leads to a better blended collage rather than a lot of blocked shapes.


I arranged them as I liked, having fun with colours and patterns and textures of the different papers. I wanted to create a flower garden with a path, so I layered pictures from flower advertisements in a hodge podge manner, but if you preferred you could lay them out in neat lines or shapes.


What's great about this project is that it can be done however you (or your children) want it to be; if you wanted a spooky halloween project, this is quick, cheap and fun; it can be a winter house for Christmas, or you could try different techniques and shapes to make it into a fairytale castle or home from a book. It doesn't have to be perfect; if you don't have pretty pictures, you can photocopy ones from books in the library, or use free magazines from garden centres. You could even cut out little furniture pictures from catalogues!

Breaking the Rules of Quilting; Again.

Ever the rebel, I decided to make a fabric picture apropos of nothing but a bunch of scraps and a hankering to try out the fancy automatic stitches on mum's sewing machine. I didn't bind it (because I hadn't left enough space for a border), instead finished the edges with a pinking shears in the hope of making it look a little more respectable.


I wanted to draw a picture of a fairy-tale tower on a cliff high above the sea. I started out by laying shapes of fabric on a white cotton background, finding which composition worked well before machine sewing them in place.


The fun was really in the finishing; the little buttons and beads used for the details, and using the beautiful automatic stitches on mum's machine, like the climbing vine stitch on the front of the building, and the twirly twin leaves for the "iron bedstead".


Sometimes I think it's very easy to get too tied up in large, overbearing projects that have a tendency to grow beyond their original means. I like to deal with small, manageable projects, that I can play around with and have fun with without it becoming a chore or something I have to come back to.
 Of course, there is a time and a place for projects such as these; I would love to turn this fabric picture into a large scale quilt, maybe as inspiration for a picture top or even as a block that I somehow attach.


What I really wanted to do was use up some fabric scraps I had lying around that I really liked, but didn't really go with anything else. Why don't you try having some fun, trying out some new ideas and ignoring the bigger picture for a while?

Paper Fabric Art Book


A lovely friend of my family came over recently to host a day making fabric paper; a technique where you bind sheets of paper, tissue paper and thin muslin together with thinned PVA to create a tough but soft material perfect for both sewing and drawing on. My finished piece turned into a house.


The best bit of this technique was being able to control the exact colour and composition of the finished material; I cut a small square out of a few layers of the paper as I stuck them down, to create a section that was thinner than the rest. I turned it into the window of my house (see above) because I loved how it let in more light and showed the painted outside.


The best part was creating the colourful front; by layering colours of tissue paper, little fragments of paper, and large washes of diluted paints and dyes, you can create a really beautiful finished piece. My favourite technique was sprinkling little pinches of powdered dye (brusho works well) onto the wet tissue paper, where it spread out in small starbursts of colour, which is how I got the blotched affect above.

Finally, I sewed the edges of the paper to make it a stronger bond. I was ready to turn it into something!


It was meant to be the cover for a book of photographs (which is why I had written "photo book" on the front cover) but it turned out to have shrunk a bit, and was therefore too small for the photos. Instead, I sketched a few ideas onto the back side, before deciding that the little clearer square was definitely supposed to be a window, even if I didn't know it at the time. So it became a house.


I had great fun playing with textures and shapes; I machine embroidered the outline for the door, and the cat flap within the door, before drawing over the outside with felt tip pen and biro. I used scraps of fabric for the stairs, table, bed, curtains and carpet, but the rest I either drew on in black Pitt marker or machine embroidered on.


I wrote the story of the house in all the spaces that I had left over. I can't read my handwriting much any more, but it says something about the cat on the bed and having high tea and cakes.

Even if you don't have the chance to make the fun paper fabric, why don't you try making a house or interactive picture from a small quilt or altered book?