Friday 28 August 2015

A Gorgeous Gift

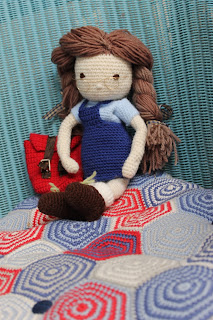
I am so, so, so lucky! For my birthday recently, I got given a handmade crocheted doll from my Aunt Kate. 


Isn't she absolutely gorgeous?!


All her clothes and accessories are removable, and I will definitely be making her some more outfits in the near future! My favourite is her lovely satchel, which actually opens and closes with space inside!


The pattern for Mabel and many others like her are from the book "My Crochet Doll" by Isabelle Kessedjian. 
And I've just realised the chair she is sat on was also made by Kate! Isn't she clever?

Sylvanian Garden DIY Tutorial

If, like me, you wanted your toys to have some really cool accessories, nothing ranked higher than a realistic garden diorama to play with! So, now with the tools and the practice, I am able to make those dreams a reality. A few years too late for me, but hopefully you or your children will love it!


First, we start with our materials; foam board (A3 size originally), loose coffee grounds, a LOT of tea leaves (I have used green tea leaves from a very cheap supermarket brand, they give a lovely green grass affect), some PVA, wooden sticks or chopsticks, and either a professional terrain makers set of wood chips or another fine material such as sand or grit.


First, I cut my board to size, and arranged a few pieces on it to get the general shape and design of the garden. I really wanted to make a miniature vegetable garden, as well as space for another accessory such as the Beekeeper set from Sylvanian families (see post below!) or the garden table and chairs.


Using the offcuts of foam board, I made a template of the size of my "vegetable patch" and cut it out of the board. This is so the garden is raised above the level of the rest of the garden, similar to a raised bed we have in our own garden.


After cutting, the foam board doesn't fit perfectly but I wanted a rustic-style garden so that's okay. If you would like to use other materials, such as painted cardboard, a pair of wooden chopsticks or lolly-pop sticks, that would also work really nicely.


I covered the board in a LOT of glue.


Then dusted over a THICK layer of coffee grounds. I made the mistake of not putting a piece of paper under the board first, which would be able to catch the run off after. I love how it looked like soil.


I then covered the area I had allocated as "grass" with a THICK layer of PVA glue.


Again, make sure to put a piece of paper underneath the foam board before you do this, because then you can tip the run off tea leaves back onto the board to cover up any holes.


The tea leaves work really well, I think!


After tipping off the excess.


I have used "Battlefield" brand "battlefield rocks" which are really small brown chips of a cardboard-like material. These are expensive, but give a really, really lovely effect. If you are working to a very strict budget, think about using sand, grit from your garden, or fine grain sawdust, but do remember these will give a different look.


I repeated the steps with the gravel, adding a really thick layer of glue first because of the large size of the particles.


After tipping off the excess.....


Splodge a large amount of glue straight onto the grass (or, if you are smarter than I am, plan ahead and leave a small space for the garden to be glue onto the board) and press the coffee-covered board down so it sticks.


It's okay if the glue pours out the sides a little, because this can be used to stick the wooden frame to the coffee board.


Nearly finished...


I used some more professional terrain material (Battlefields brand foliage), tearing small pieces off and gluing them onto the coffee board in rows.


Looking pretty good!!!!


The finished article (close up)


A few glamour shots with some helpful modelling!


I would have committed murder to have this toy as a child. It makes the toys seem so much more alive, and feels much more real than the plasticky gardens you get elsewhere. However it is a very messy job, and bits of tea leaves and flocking will fall off as they are played with, so if you are houseproud make sure they play with this outside or on an easily-hooverable area!

A Beary Little Beekeeper

I ordered a Sylvanian family Beekeeper figure off Ebay for my father, who is also a keeper of bees. I made a small diorama to sit him upon (the figure, not my father) and will upload a DIY tutorial soon but first.....


It even has little frames of honeycomb and bees!


I had to add a pair of glasses to really resemble the man himself. I'm really pleased with how the diorama looks in size scale, so check out the next post to find out how to make one for yourself!


Monday 24 August 2015

Cake Craft

I can't think of a good opener, so just be in awe of my birthday cake!


I completely cheated on it, not making the flowers or the cake itself; instead I bought a pack of ready-roll icing, six royal icing flowers, a Frozen sprinkler and glittery icing pens. 


 All I really did was the design, and cutting out the blue icing leaves, but it was so much fun! I know it doesn't really 'count' as cake craft, but as a first timer I was really pleased with how the design turned out!


Wednesday 12 August 2015

Barney the Bakers' Boy

For my birthday, mum bought me a gorgeous book called "Purely Primitive Dolls" by artist Barb Moore. In it, she describes techniques and designs for making one-of-a-kind primitive dolls out of old, preloved fabrics and materials. 


I furiously dyed my way through a whole rag bag in preparation for this, and although I came out with pink-stained hands and frizzy hair smelling like coffee, I think it was well worth it. All of Barney; his body, his hair, his clothes, the stuffing, is made from rags and hand dyed materials.


He was actually supposed to have two eyes, but I got very overexcited and managed to break off a needle in his head when stitching the second button on, so I had to leave it as was with bits of black thread hanging out. Mum loves it, thinks it looks "folk".


With his full outfit; tunic, trousers and a bakers' apron (which was actually a cloth that I mopped up a spilled puddle of coffee with during the dyeing process, and discovered I loved it. So I added some jam as well, just to complete the look). I absolutely enjoyed making this doll so much, and it was so quick and easy because I wasn't worried about perfection.


Barney and the book by Barb!

Getting Berried Away

During last weeks dyeing marathon, I got very carried away with the home made colours and decided to berry dye a piece of fabric I had laid out ready for the coffee treatment.


The harvest is already done, but there are still some late fruit and low hanging bits that I was able to scrounge out of the garden. First, blackcurrants:


Then a few Loganberries:


A number of Raspberries:


 And a whole bunch of Redcurrants:


After picking a good two handfuls of fruit, I folded them into the fabric....


and SQUASHED!


I squashed and squashed until my hands were also stained pink and purple. I liked how there were different colour variations all the way through from the different berries.


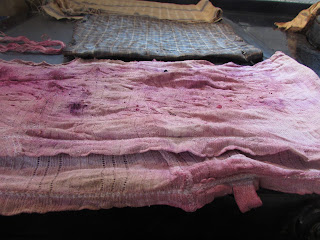
After baking, it turned out a pretty graduated pink!


With my other dyed pieces, ready to be made into something....

Cup of Tea or Coffee?

After talking to the lovely ladies down in Hastings, and receiving a book as a birthday present just on the very topic, I set out today to do a little dyeing.


I started with a pan of hot water, which I brought to the boil before adding a metric tonne of coffee (I didn't measure it and got a little carried away). At the same time, I had a smaller pot which I filled with loose leaf herbal tea and boiling water.


I had absolutely no idea how any of it was going to turn out, which was so exciting! It reminded me of doing science experiments, or making "potions" as a child out of leaves and flowers in the garden. I lived a very sheltered childhood.


Raided the cloth drawer for a bunch of old rags, and cut up a few bits of plain fabric to go in too.
Adding the fabric to the bubbling pot felt so wrong, like I was going to pull it out and have it covered in dinner or something.


But in they went.


To continue with the theme of experimentation, I did a little ad-hoc tye-dyeing with some thick cotton thread I had lying around. I was excited to see if the thread kept all the dye out completely, or if it would make any difference at all.


 Adding it to the coffee mixture!


Added another thorough coating of ground coffee because I wanted there to be darker splodges on areas, which worked out very well actually.


After a good half hour's boiling, I laid the fabric out on tin-foil covered baking trays and baked in the oven. I really regretted not rinsing the tea leaves off this piece first, because they became encrusted on and had to be washed and baked again.


The Aga is full of fabric and covered in fabric, just the way it should be!


Wait to see what they are going to become......